

KV 14
Tausert and Setnakht


Entryway A
See entire tombThe undecorated entrance is cut directly into the cliff face and was open to the sky. The left (south) side of the entry is much shorter than the right (north). There is an overhang at the west end of the entry projecting from above the lintel of gate B. After the 1994 floods, a concrete roof was built over the entrance against the cliff face. The walls are in good condition.

Modern steps leading to tourist shelter and tomb entrance with modern covering.

Tomb entrance with modern covering for flood protection and old information sign.


Gate B
See entire tombThe short overhang of entryway A projects out from above this gate's lintel, which is decorated with a sun disk containing the scarab and ram-headed forms of the sun god Ra, flanked by kneeling figures of Isis and Nephthys, and Tausert's queenly titles. A second, slightly larger version was carved over this by Setnakht. The reveals are decorated with texts. Both the outer and inner thicknesses on the left (south) side of the gate were cut away in antiquity, as was the inner thickness on the right (north) side (except at the top). The outer thicknesses have been replaced or supplemented by modern concrete jambs to support a metal gate. Three modern steps were added to the original step down to the floor of corridor B.
Porter and Moss designation:

Ancient plaster traces; lintel beam slot and partly cut back inner thicknesses.

Corridor B
See entire tombThe corridor slopes down gently to corridor C. On the left (south) wall are altered scenes of Tausert offering vases to Ra-Horakhty and food to Anubis, Siptah (changed to Sety II) offering the image of Ma'at to Isis, and Setnakht (superimposed on Tausert) before Horus and receiving an ankh from Nefertem. The right (north) wall shows Tausert before Ptah and Ma'at, Siptah (changed to Sety II) followed by Tausert offering to Geb, and Setnakht (superimposed on Tausert) offering to Ra-Horakhty, Hathor and Nephthys.
Porter and Moss designation:

Sety II (replacing Siptah) offering to Isis (scene 3).
Ancient plaster traces; lintel beam slot and partly cut back inner thicknesses.

Sety II (replacing Siptah) and Tausert offering [to Geb].

Setnakht (replacing Tausert) offering to Anubis.

Setnakht (replacing Tausert) [before Horus].

Tausert and Sety II (replacing Siptah) before Geb (scene 2) (reconstruction).

Tausert [and Sety II (replacing Siptah)] offering [to Geb] (scene 2) (reconstruction).

Sety II (replacing Siptah) and Tausert offering to Geb (reconstruction).

Deceased offering to the deities Ra-Horakhty and Isis; left wall Corridor B. Courtesy of Richard Sellicks.

Corridor B, left wall. Sethnakht, superimposed on Tausert, offering to the syncretic deity Ra-Horakhety. Courtesy of Richard Sellicks.


Gate C
See entire tombThe gate has a single step which leads to corridor C. The outer thicknesses have been cut away. On the inner thicknesses are representations of Hathor.
Porter and Moss designation:
Corridor C
See entire tombSalt efflorescence has damaged the painted decoration here, which includes traces of excerpts from Book of the Dead spells 145 and 146. On the left (south) wall is a scene in which Sety II is purified by Anubis, followed by a partly preserved scene of a gate and guardian. On the right (north) wall, Sety II offers to three guardians. Beam holes are cut in the walls midway through the corridor.
Porter and Moss designation:

Book of the Dead, spell 145.

Cartouches of Setnakht replacing images of Tausert; Book of the Dead, spell 145.

Book of the Dead, spell 145 (reconstruction).

Book of the Dead, spell 145: Sety II (replacing Siptah) (scene 2) (reconstruction).

View from Corridor C with chamber F in the background. Courtesy of Uni Dia Verlag; Uni Dia Image Nr. 36051.

Guardian demon in Book of the Dead spell 145. Courtesy of Uni Dia Verlag; Uni Dia Image Nr. 36078.

Corridor C looking toward Gate D and Corridor D and the rear wall of Chamber F featuring the deities Horus and Anubis before Osiris. Courtesy of Richard Sellicks.


Gate D
See entire tombOn the inner thicknesses, Meretseger as a winged cobra rests on a basket above a djed pillar and tyet knot. The outer thicknesses have been cut back and Setnakht's cartouches painted on the new surface.
Porter and Moss designation:

Meretseger as winged cobra on basket over djed-pillar and tyet-knots.

Corridor D
See entire tombSalt efflorescence has damaged the painted decoration on the walls. On the left (south) and right (north) walls are spells 145 and 146 of the Book of the Dead with four guardians holding knives.
Porter and Moss designation:

Corridor D, right wall. Book of the Dead, spells 145 and 146: guardians at their gates. Courtesy of Richard Sellicks.

Gate E
See entire tombThe outer thickness have been cut back flush to the inner ones. The outer thickness surfaces have cartouches of Setnakht painted on them and the inner thicknesses are decorated with figures of Hathor in sunk relief.
Porter and Moss designation:
Chamber E
See entire tombThere was no shaft cut in the floor. The walls are decorated with several scenes of deities: Osiris, Imsety, Anubis, Duamutef, Isis, Hapy, Qebehsenuef, Nephthys and Horus-Iwnmutef.
The painting surface is irregular. The painted plaster is composed of three layers: a thick plaster layer, white wash, and a final paint layer. An exception is the name of Setnakht, which was painted on a different plaster layer. In some places, the plaster has separated from the walls. A lot of color is preserved, although there is some damage to the blue paint due to lack of cohesion.
Porter and Moss designation:

Horus-Iwnmutef; Horus and Anubis before Osiris.

Horus-Iwnmutef.

Anubis and Hapy.

Chamber E, left wall, the funerary deities Imsety, Anubis, and Duamutef, as well as the goddess Isis; Chamber E, rear wall, left side, the syncretic god Horus-Iwnmutef.

Chamber E, rear wall, right side, the syncretic god Horus-Iwnmutef; right wall, the goddess Nephthys, and the gods Qebehsenuef and Anubis. Courtesy of Richard Sellicks.


Gate F
See entire tombThe outer thicknesses have been cut back flush to the inner ones. The thicknesses are decorated with djed-pillars and the cartouches of Setnakht.
Porter and Moss designation:

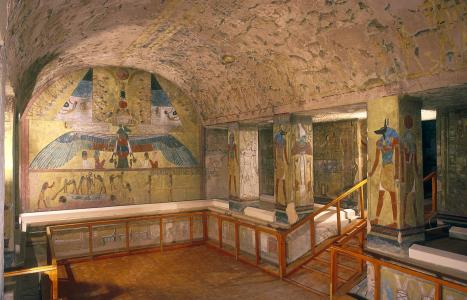
Jambs of Gate F with reliefs of the syncretic god Horus-Iwnmutef and the rear wall of Chamber F with the deities Horus and Anubis before Osiris. Courtesy of Richard Sellicks.

Chamber F
See entire tombThe chamber lacks pillars, but a central descent takes up the axial floor space. Book of the Dead spell 146 decorates the right (north) and left (south) walls. A double scene of the deceased before Osiris on the rear (west) wall originally showed Tausert led before Osiris by Anubis and Horus, but her figures have been erased and replaced by large-scale cartouches of Setnakht. This was also done on the right and left walls.
Porter and Moss designation:
Horus-Iwnmutef; Horus and Anubis before Osiris.

Double scene of Tausert (erased) led by Horus and Anubis before Osiris; image of queen replaced by cartouches of Setnakht.

Book of the Dead, spell 145: guardian; cartouches of Setnakht (replacing image of Tausert).

Cartouches of Setnakht (replacing image of Tausert); Book of the Dead, spell 145.

Book of the Dead, spell 145; cartouches of Setnakht replacing image of Tausert.

Book of the Dead, spell 145: guardian; cartouches of Setnakht (replacing image of Tausert). Courtesy of Uni Dia Verlag; Uni Dia Image Nr. 36079.

Detail of Book of the Dead, spell 145: guardian; cartouches of Setnakht (replacing image of Tausert). Courtesy of Uni Dia Verlag; Uni Dia Image Nr. 36080.

Double scene of Tausert (erased) led by Horus and Anubis before Osiris; image of queen replaced by cartouches of Setnakht. Courtesy of Uni Dia Verlag; Uni Dia Image Nr. 36081.

Book of the Dead, spell 145. Courtesy of Uni Dia Verlag; Uni Dia Image Nr. 36082.

Detail of Book of the Dead, spell 145. Courtesy of Uni Dia Verlag; Uni Dia Image Nr. 36083.

Detail of Book of the Dead, spell 145. Courtesy of Uni Dia Verlag; Uni Dia Image Nr. 36084.

View of Northwestern corner of Chamber F - Book of the Dead, spell 145. Courtesy of Uni Dia Verlag; Uni Dia Image Nr. 36085.

Detail of Book of the Dead, spell 145. Courtesy of Uni Dia Verlag; Uni Dia Image Nr. 36086.

Detail of Book of the Dead, spell 145. Courtesy of Uni Dia Verlag; Uni Dia Image Nr. 36087.

Right and rear walls of Chamber F. Book of the Dead, Spell 145; guardian deities and their gates. Courtesy of Richard Sellicks.

Left and rear walls of Chamber F. Book of the Dead, Spell 145; guardian deities and their gates. Courtesy of Richard Sellicks.

The rear wall of Chamber F. The deities Horus and Anubis before Osiris. Courtesy of Richard Sellicks.

The rear wall of Chamber F. The deities Horus and Anubis before Osiris. Courtesy of Richard Sellicks.


Descent F
See entire tombThe slope of the descent begins at the inner edge of gate F and ends in gate G. There are no steps cut in the ramp; its surface is irregular. There are remains of scenes from Book of the Dead spell 151 at the lower ends of the side walls of the descent showing an Anubis jackal above kneeling figures of Isis and Nephthys on the left (south) and right (north), respectively.
Porter and Moss designation:
Corridor G
See entire tombThe floor and ceiling of corridor G are flat and the gate to a side chamber has been cut into the center of the left (south) wall. The decoration on the right (north) and left (south) walls shows scenes and texts from the Opening of the Mouth ritual.
Porter and Moss designation:
Gate G
See entire tombThe outer thicknesses have been cut back to the level of the inner thicknesses, which bear winged Ma'at figures. There is a step down in the gate at the location of the outer thicknesses.
Porter and Moss designation:
Gate Ga
See entire tombThe gate is situated in the left (south) wall of corridor G and leads into side chamber Ga.
Porter and Moss designation:
Side chamber Ga
See entire tombDjed pillars were carved on both sides of the entrance gate of this small, rectangular side chamber, which is unique to this tomb. On the left (east) and right (west) walls, the king (originally the queen) offers to two Sons of Horus, Anubis, and two goddesses. On the rear (south) wall, Anubis tends a mummy between Isis and Nephthys.
Porter and Moss designation:

Book of the Dead, spell 151: Anubis attending mummy on bier with Isis and Nephthys as principal mourners at foot and head.

Book of the Dead, spell 151: Anubis embalming mummy of deceased (reconstruction).

Side Chamber Ga rear wall. Book of the Dead, spell 151: the deity Anubis attends to a mummy on a bier with the goddesses Isis and Nephthys as principal mourners at the foot and head.

Side Chamber Ga, left wall. Two sons of Horus, Anubis, and two goddesses. Courtesy of Richard Sellicks.


Gate H
See entire tombThe left (south) jamb has been cut away flush to the wall and a figure of a king painted there. A winged Ma'at decorates the right (north) thickness.
Porter and Moss designation:
Corridor H
See entire tombNear the front (east) end of the corridor are a pair of beam holes. On the left (south) and right (north) walls are scenes and texts from the Opening of the Mouth ritual.
Porter and Moss designation:
Gate I
See entire tombThe gate leading into corridor I has compound jambs with their outer thicknesses cut back. There are representations of Hathor on the inner thicknesses. The threshold slopes down from front to rear (east to west).
Porter and Moss designation:
Chamber I
See entire tombOn the right (south) half of the front (east) wall, a table of offerings replaced an erased figure of Tausert and representations of Thoth, Ra-Horakhty and Ptah, protected by a winged Ma'at. Osiris, Isis, Nephthys, Horus, Geb and Ptah are protected by Ma'at on the right (north) wall of the chamber. Representations of the king and queen have been replaced by large cartouches of Setnakht.
Porter and Moss designation:

Ra-Horakhty, Ma'at, Thoth alternating with large cartouches of Setnakht replacing erased figures of queen. Ptah protected by winged Ma'at on each side of gate. Courtesy of Uni Dia Verlag; Uni Dia Image Nr. 36052.

Ra-Horakhty and Ma'at between Cartouches of Setnakht. Courtesy of Uni Dia Verlag; Uni Dia Image Nr. 36054.

Horus and Geb between alternating cartouches of Setnakht. Courtesy of Uni Dia Verlag; Uni Dia Image Nr. 36055.

Nephthys and Isis, Osiris before offering table replacing erased figure of queen. Courtesy of Uni Dia Verlag; Uni Dia Image Nr. 36056.

Nephthys and Isis. Courtesy of Uni Dia Verlag; Uni Dia Image Nr. 36057.

Nephthys and Isis. Courtesy of Uni Dia Verlag; Uni Dia Image Nr. 36058.

Chamber I, left wall. The deities Ra-Horakhty and Ma'at between the cartouches of Setnakht. Courtesy of Richard Sellicks.

Chamber I, right and front wall. The deities Isis and Nephthys (right) and Osiris (front) before an offering table replacing an erased figure of the queen. Courtesy of Richard Sellicks.

Chamber I, front wall, right part. Detail of the four Sons of Horus on a lotus blossom in front of the deity Osiris enthroned. Courtesy of Richard Sellicks.

Chamber I, rear wall, left part. The deity Ptah protected by the winged deity Ma'at on each side of the gate. Courtesy of Richard Sellicks.


Gate J1
See entire tombThis large rectangular chamber has a vaulted central ceiling above a sunken lower floor, flanked by a row of four pillars at the front and rear (east and west). The long axis of the vault is perpendicular to the axes of the preceding corridors. A ramp descends from gate J to the sunken floor, bisecting the front upper floor level, topped by a row of four square pillars. The row of pillars on the rear upper floor level are rectangular in section, their right (north) and left (south) faces wider than their front and rear faces. The rear half of the upper floor level is bisected by a passage at the level of the sunken floor leading to gate K1. Narrow benches project from the right and left halves of the rear wall above the upper floor level. The tops of the low walls surrounding the sunken lower area are all decorated with torus molding and a cavetto cornice.
The right end of the right wall and the left half of the front wall of the upper level are decorated with the eighth division (P)/ninth hour (H) of the Book of Gates. The right half of the front wall and left end of the left wall of this same level are decorated with the upper and lower registers of the ninth division (P)/tenth hour (H) and the middle register of the tenth division (P)/eleventh hour (H) of the Book of Gates. The Book of the Earth is shown on the upper level right and left walls, and the Book of Caverns on the right. The rear wall of the upper level was left undecorated.
Porter and Moss designation:

Ptah protected by winged Ma'at on side of gate J1. Courtesy of Uni Dia Verlag; Uni Dia Image Nr. 36053.

Burial chamber J1
See entire tombThis large rectangular chamber has a vaulted central ceiling above a sunken lower floor, flanked by a row of four pillars at the front and rear (east and west). The long axis of the vault is perpendicular to the axes of the preceding corridors. A ramp descends from gate J to the sunken floor, bisecting the front upper floor level, topped by a row of four square pillars. The row of pillars on the rear upper floor level are rectangular in section, their right (north) and left (south) faces wider than their front and rear faces. The rear half of the upper floor level is bisected by a passage at the level of the sunken floor leading to gate K1. Narrow benches project from the right and left halves of the rear wall above the upper floor level. The tops low walls surrounding the sunken lower area are all decorated with torus molding and a cavetto cornice.
The right end of the right wall and the left half of the front wall of the upper level are decorated with the eighth division (P)/ninth hour (H) of the Book of Gates. The right half of the front wall and left end of the left wall of this same level are decorated with the upper and lower registers of the ninth division (P)/tenth hour (H) and the middle register of the tenth division (P)/eleventh hour (H) of the Book of Gates. The Book of the Earth is shown on the upper level right and left walls, and the Book of Caverns on the right. The rear wall of the upper level was left undecorated.
The vault bears traces of an astronomical scene with decans, northern constellations, and associated deities. The pillars were partially decorated with representations of different deities and of the king, whose figure has been replaced, or at least re-named, by Setnakht. In the lower registers of the side walls, and on the walls surrounding the sunken central floor, were illustrations of traditional funerary equipment.
Chamber plan:
RectangularRelationship to main tomb axis:
PerpendicularChamber layout:
Pillared front and rear upper level, sunken central lower levelFloor:
Two levelsCeiling:
Vaulted center, flat sides
Porter and Moss designation:

Book of Caverns, sixth division, final scene; Ba of Ra; Book of the Earth, part A, scenes 2 and 3: excerpts; Geb before Setnakht; Anubis and Osiris [before Setnakht, on front face of pillar 5]; Anubis [with Ra-Horakhty before Setnakht, on right and front faces of pillar 3]; Thoth; Book of Gates, eighth division (P)/ninth hour (H); funerary objects beneath all.

Setnakht (as sketch) and Horus.

Book of Caverns, final scene; Ba of Ra; Book of the Earth, part A, scenes 1-2, extracts.

Book of the Earth, part A, scenes 2 and 8: extracts.

Quantapoint laser-scanning team of Eric Hoffman, Bill Irey, and Lee Greenwood setting up equipment.

Tausert [and Sety II (replacing Siptah)] offering ointment [to Geb] (KV 14)

Kheker frieze & Geb

Book of Caverns, final scene of sixth division: variant, with ba of Ra beneath (reconstruction)

Book of Gates, eighth division (P)/ninth hour (H), scene 56: souls in the Island of Flame (detail)

Book of the Earth, part A: personification of water clock (detail)

Osiris seated in shrine with the four sons of Horus on Lotus.

Book of Gates, eighth division (P)/ninth hour (H), scene 60: fire-spitting serpent destroying enemies of Osiris (detail).

Book of Gates, ninth division (P)/tenth hour (H), scenes 63 and 68; tenth division (P)/eleventh hour (H), scene 77.

Book of Gates, ninth division (P)/tenth hour (H), scenes 61-62 (upper register), 68 (lower register); tenth division (P)/eleventh hour (H), scenes 72-73 (middle register).

Book of Gates, tenth division (P)/eleventh hour (H), scenes 72-73 (detail).

Book of Gates, ninth division (P)/tenth hour (H), scenes 61 (upper register), 68 (lower register); tenth division (P)/eleventh hour (H), scenes 70-72 (middle register).

Book of Gates, ninth division (P)/tenth hour (H), scenes 61 (upper register), 68 (lower register); tenth division (P)/eleventh hour (H), scene 70 (middle register).

Book of Gates, tenth division (P)/eleventh hour (H), scene 70: solar bark (detail).

Hathor, Nefertem and Thoth.

Thoth; Setnakht [before Osiris, on right face]; Osiris [before Setnakht, on front face].

Osiris [before Setnakht, on front face]; Setnakht [before Osiris, on left face]; Ra-Horakhty.

Ra-Horakhty; Mehitweret and Khnum [before Setnakht, on left face].

Book of Gates, eighth division (P)/ninth hour (H), scenes 55, 57, 59.

Book of Gates, eighth division (P)/ninth hour (H), scenes 59-60: fire-spitting serpent destroying enemies of Osiris.

Book of Gates, eighth division (P)/ninth hour (H), scenes 56, 58, 60.

Kheker frieze; Geb; Setnakht [before Mehitweret and Khnum, on front and right faces].

Kheker frieze; Anubis and Osiris [before Setnakht, on front face].

Osiris and Anubis [before Setnakht, on front face].

Kheker frieze; Setnakht before Horus.

Book of Gates, tenth division (P)/eleventh hour (H), scene 77: "The Callers" (reconstruction).

Mehitweret as a cow-headed woman [before Setnakht, on left face] (reconstruction).

Decorative vessels (reconstruction).

Horus and Anubis on pillars, incomplete images of Setnakht on right and left faces of pillars. Courtesy of Uni Dia Verlag; Uni Dia Image Nr. 36059.

View of one of the left first niche Book of Gates, ninth division (P)/tenth hour (H), scenes 63 and 68; tenth division (P)/eleventh hour (H), scene 77. Courtesy of Uni Dia Verlag; Uni Dia Image Nr. 36060.

View of niche and texts in Burial chamber J1. Courtesy of Uni Dia Verlag; Uni Dia Image Nr. 36061.

Detail from the Book of Gates eighth division (P)/ninth hour (H) (north side), ninth and tenth divisions (P)/tenth and eleventh hours (H). Courtesy of Uni Dia Verlag; Uni Dia Image Nr. 36062.

Detail from the Book of Gates eighth division (P)/ninth hour (H) (north side), ninth and tenth divisions (P)/tenth and eleventh hours (H). Courtesy of Uni Dia Verlag; Uni Dia Image Nr. 36063.

Detail from the Book of Gates eighth division (P)/ninth hour (H) (north side), ninth and tenth divisions (P)/tenth and eleventh hours (H). Courtesy of Uni Dia Verlag; Uni Dia Image Nr. 36064.

Detail from the Book of Gates eighth division (P)/ninth hour (H) (north side), ninth and tenth divisions (P)/tenth and eleventh hours (H). Courtesy of Uni Dia Verlag; Uni Dia Image Nr. 36065.

View of the northeastern corner on Burial Chamber J1. Courtesy of Uni Dia Verlag; Uni Dia Image Nr. 36066.

Book of Gates, eighth division (P)/ninth hour (H), scenes 56, 58, 60. Courtesy of Uni Dia Verlag; Uni Dia Image Nr. 36067.

Anubis and Khnum, pillar on western side of burial chamber J1. Courtesy of Uni Dia Verlag; Uni Dia Image Nr. 36068.

Setnakht (replacing original figure) before Mehitweret. Courtesy of Uni Dia Verlag; Uni Dia Image Nr. 36069.

Khnum and Mehitweret. Courtesy of Uni Dia Verlag; Uni Dia Image Nr. 36070.

Book of the Earth, part A, scenes 2 and 8: extracts. Courtesy of Uni Dia Verlag; Uni Dia Image Nr. 36071.

View of Burial Chamber J1. Courtesy of Uni Dia Verlag; Uni Dia Image Nr. 36072.

Detail of Book of Caverns, final scene; Ba of Ra; Book of the Earth, part A, scenes 1-2, extracts. Courtesy of Uni Dia Verlag; Uni Dia Image Nr. 36073.

Detail of Book of Caverns, final scene; Ba of Ra; Book of the Earth, part A, scenes 1-2, extracts. Courtesy of Uni Dia Verlag; Uni Dia Image Nr. 36074.

View of burial equipment painted on rock cut bench. Courtesy of Uni Dia Verlag; Uni Dia Image Nr. 36075.

Detail of Hathor. Courtesy of Uni Dia Verlag; Uni Dia Image Nr. 36076.

Detail of Nefertum. Courtesy of Uni Dia Verlag; Uni Dia Image Nr. 36077.

Burial chamber J1, front face of one of the pillars (right side in the front part of the room). Preliminary sketch of Setnakht. Courtesy of Richard Sellicks.

Burial chamber J1, front pillars, right side. The deity Osiris and Pharaoh Setnakht (left pillar); Setnakht and the goddess Mehitweret (right pillar). Courtesy of Richard Sellicks.

Burial chamber J1, left wall, center part. Book of the Earth, part A, scenes 2 and 8: extracts. Courtesy of Richard Sellicks.

Burial chamber J1. Rear left pillars. The deities Anubis, Khnum (left pillar), and Ptah (right pillar). Courtesy of Richard Sellicks.

Burial chamber J1, right wall, center part. Book of Caverns, final scene; Ba of the deity Ra; Book of the Earth, part A, scenes 1-2: extracts. Courtesy of Richard Sellicks.

Burial chamber J1, front, left part. Pillars with the deity Osiris in a hemhem-crown beside two imiut-fetishes; the deities Anubis and Horus. Front, right part, pillar with Pharaoh Setnakht. Courtesy of Richard Sellicks.

Burial chamber J1, rear wall, left pillar. The deity Khnum. Courtesy of Richard Sellicks.

Burial C=chamber J1, front wall, right part. Book of Gates eighth division (P)/ninth hour (H) (north side), ninth and tenth divisions (P)/tenth and eleventh hours (H). Courtesy of Richard Sellicks.


Gate J1a
See entire tombThe gate leads from the left (south) wall of burial chamber J1 to side chamber J1a.
Side chamber J1a
See entire tombSide chamber J1a is situated off the left (east) end of the left (south) wall of burial chamber J1. The chamber has been only roughly cut and is not decorated.
Gate J1b
See entire tombThe gate leads from the right (west) end of the left (south) wall of burial chamber J1 to side chamber J1b.
Porter and Moss designation:
Side chamber J1b
See entire tombThis side chamber was only roughly cut and is undecorated.
Porter and Moss designation:
Gate J1c
See entire tombThe gate leads through the left (west) end of the right (north) wall of burial chamber J1 to side chamber J1c.
Porter and Moss designation:
Side chamber J1c
See entire tombSide chamber J1c was only roughly cut and is undecorated.
Porter and Moss designation:
Side chamber J1d
See entire tombSide chamber J1d was only roughly cut and is undecorated.
Gate J1d
See entire tombThe gate leads through the right (east) half of the right (north) wall of burial chamber J1 to side chamber J1d.
Gate J2
See entire tombThe gate has compound jambs and a single step. A slot for a beam beneath the lintel indicates an intention to close the gate by a pair of door leaves. The inner thicknesses are decorated with figures of Ma'at kneeling. The cartouches on the reveals were redone by Setnakht to cover the name of Tausert.
Porter and Moss designation:
Burial chamber J2
See entire tombThis chamber replicates the features of burial chamber J1, but on a larger scale. The upper floor level is interrupted by a sunken central area, flanked on the front (east) and rear (west) by a row of four pillars. Cavetto cornices decorate the tops of the low walls surronding the sunken central area. The eight pillars are square in section and the ceiling surfaces between them and the chamber walls are flat. The ceiling above the sunken lower floor is vaulted, with its longitudinal axis perpendicular to that of the tomb. Right (north) of the center of the floor stands the broken sarcophagus of Setnakht. The upper floor level is bisected at front and back by a ramp descending to the sunken lower floor level from the edges of gates J2 and K2.
Only the front (east) half of the chamber was decorated. On the left (north) part of the east wall is the eighth division (P)/ninth hour (H) of the Book of Gates, and on the right (south) part are scenes in three registers from the eleventh division (P)/twelfth hour (H) of the same composition. On the wall above the gate leading to side chamber J2a is the gate of the twelfth division of the Book of Gates. The pillars have suffered substantial damage and only pillar 1 is decorated with a representation of Thoth holding a palette. The vaulted ceiling has an astronomical scene.
Chamber plan:
RectangularRelationship to main tomb axis:
PerpendicularChamber layout:
Pillared front and rear upper level, sunken central lower levelFloor:
Two levelsCeiling:
Vaulted center, flat sides
Porter and Moss designation:

Burial chamber J2.

Ramp.

Restored red granite sarcophagus of Setnakht.

Cartouche of Setnakht inscribed over the name of earlier owner; red granite sarcophagus.

View of Burial chamber J2 and the sarcophagus. Courtesy of Richard Sellicks.

Burial chamber J2, sarcophagus, left face. Cartouches of Setnakht and the deities Isis and Nephthys in mourning. Courtesy of Richard Sellicks.

Burial chamber J2. Lid of the sarcophagus. Courtesy of Richard Sellicks.

Burial chamber J2. Lid of the sarcophagus. Courtesy of Richard Sellicks.

View of Burial chamber J2 and the sarcophagus, looking toward the entrance of the tomb. Courtesy of Richard Sellicks.

View of Burial chamber J2 and the sarcophagus; Imydwat, seventh and eighth hours, Corridor L. Courtesy of Richard Sellicks.


Gate J2a
See entire tombThe gate leads from the left (east) end of the left (south) wall of burial chamber J2 into side chamber J2a.
Side chamber J2a
See entire tombThe chamber is undecorated.
Gate J2b
See entire tombThe gate leads through the right (west) end of the right (south) wall of burial chamber J2 into side chamber J2b.
Side chamber J2b
See entire tombThe chamber is undecorated.
Gate J2c
See entire tombThe gate leads from the left (west) end of the right (north) wall of burial chamber J2 into side chamber J2c.
Side chamber J2c
See entire tombThe chamber is undecorated.
Gate J2d
See entire tombThe gate leads from the right (east) end of the right (north) wall of burial chamber J2 into side chamber J2d.
Side chamber J2d
See entire tombThe chamber is undecorated.
Gate K1
See entire tombThe gate has compound jambs.
Porter and Moss designation:
Corridor K1
See entire tombCorridor K1, together with side chambers K1a and K1b, represents an abandoned attempt to cut a second pillared burial chamber. Two gates in the right (north) and left (south) walls, each with a step at the bottom, lead from the beginning of corridor K1 to chambers K1a and K1b, respectively. The north and south walls of the corridor are decorated with unfinished texts and scenes from the Imydwat.
Porter and Moss designation:

View from Corridor K1 into Burial chamber J1. Right and left front pillars with the deity Anubis. Courtesy of Richard Sellicks.

Side chamber K1a
See entire tombThe unfinished chamber K1a was originally intended as the southeast quadrant of a pillared burial chamber. The front (north) wall of K1a was to have been cut as a pillar. A single step leads into K1a which adjoins corridor K1 and contains a single pillar. The walls are cracked and were anciently patched with mortar and stone. There is a large hieratic graffito on the left (south) wall giving the date regnal year 6, month 2 of Akhet, day 18. Some have taken this as a work docket from the reign of Tausert. Others have interpreted this graffito and its companion in K1b as inspection dockets from the reburial activities of the priests at the end of Dynasty 20 during the sixth year of the "Renaissance." There is an additional marking in black at the right (west) end of the rear (south) wall, perhaps part of the stonecutter's sketch for carving the central vault.
Porter and Moss designation:
Side chamber K1b
See entire tombThis side chamber adjoins corridor K1 and mirrors side chamber K1a in shape. It would have represented the northeast quadrant of an abandoned burial chamber. A single step leads into the chamber. The walls are badly cracked and were anciently patched with mortar and stone. A projection from the rear (north) wall represents an uncompleted pillar. A hieratic graffito on the left (west) wall in black gives the date of regnal year 6, month 2. Some have seen this as a work docket dated to the reign of Tausert, while others see it as an inspection docket from the priestly reburial activities in the sixth year of the "Renaissance" at the end of Dynasty 20.
Porter and Moss designation:
Gate K2
See entire tombOnly the left jamb is preserved.
Corridor K2
See entire tombNear the rear (west) end of the corridor are a pair of beam holes. On the left (south) and right (north) walls are scenes and texts from the Opening of the Mouth ritual.
Gate L
See entire tombThe cartouches on the reveals were redone by Setnakht to cover the name of Tausert.
Porter and Moss designation:
Corridor L
See entire tombThe axis of this corridor is shifted to the north of previous ones. Beam holes are set in the middle of the walls of the corridor. The right (north) and left (south) walls are decorated in unpainted sunk relief with scenes from the Imydwat.
Porter and Moss designation:

View of Corridor L into Burial chamber J2. Courtesy of Richard Sellicks.

Imydwat, seventh hour. Corridor L, left wall. Courtesy of Richard Sellicks.


About
About
The tomb entrance of KV 14 is cut into the base of the cliff face at the end of the southwest branch of the main Wadi. The short open entryway A is followed by three corridors (B, C and D) decorated in sunk relief with scenes of the queen accompanying Siptah (subsequently changed to Sety II) before various deities, followed by representations of the guardians of the portals of the realm of Osiris from the Book of the Dead. Chamber E had no shaft cut into its floor. It was succeeded by pillared chamber F with a central descent but without the usual flanking pair of pillars.
There are two corridors (G and H) beyond the descent, followed by a chamber (I). There is a side chamber (Ga) off the left (south) wall of corridor G, thought by some to have been intended as a burial chamber in an earlier phase of the tomb's construction. The first burial chamber J1 has a Vaulted ceiling and sunken floor flanked by two rows of four pillars on benches to the front (east) and rear (west). Four unfinished side chambers are located at the corners of burial chamber J1. The corridor K1 to the west, with two side chambers (K1a, K1b), represents an abandoned start of the cutting of a second burial chamber. A second corridor (L) leads to the ultimate, second burial chamber J2, of larger dimensions than the first one. This chamber also has a sunken central floor and vaulted ceiling flanked by two rows of four pillars on benches to the front (east) and rear (west).
The four side chambers were completely cut, but undecorated, and only the front (east) wall of this burial chamber received preliminary drawings for decoration. A broken Sarcophagus and lid are located right (north) of the center of the sunken floor. An unfinished axial corridor (K2) to the rear (west) has an abandoned gateway cutting in each side. The tomb is decorated with scenes from the Book of the Dead (corridor C, corridor D, pillared chamber F, descent F, side chamber Ga), Opening of the Mouth ritual (corridors G and H), Book of Caverns (burial chamber J1), Book of the Earth (burial chamber J1), Book of Gates (burial chambers J1 and J2), the Imydwat (corridor K1, corridor L), as well as images of the deceased and/or deities (corridor B, gates C-E, chambers E and F, side chamber Ga, gate H, gate I, chamber I and burial chamber J1).
Noteworthy features:
KV 14 is a rare example of a queen' s tomb of the Rameside period in the Valley of the Kings re-used for a king's burial. This tomb possesses two complete burial chambers (J1 and J2); the thicknesses of gates before the first burial chamber J1 were cut back. A third burial chamber (K1, K1a and K1b) was begun but abandoned between the other two. Names and images were altered from Tausert to Setnakht and from Siptah to Sety II. Side chamber Ga is unique.
Site History
Several phases of construction have been recognized by Altenmüller, reflecting the changing status of Tausert from royal wife under Sety II, to regent during the reign of Siptah, and finally to independent ruler at the end of Dynasty 19. In the last phase, Altenmüller believes that Sety II was buried in the first burial chamber J1, but this is questionable since work was being carried out for the construction of the second burial chamber J2.
The fate of Tausert's own burial is uncertain since the tomb was taken over in Dynasty 20 for the burial of Setnakht. Her mummiform granite Sarcophagus was recently found in KV 13 where it had been re-used for the burial of prince Amenherkhepeshef. In most instances, the image and name of the queen were replaced with those of Setnakht. At some point, the names of Siptah were altered to those of Sety II, although the date of this change is not known.
Dating
This site was used during the following period(s):
Exploration
Conservation
Conservation History
New walkways and lighting have recently been installed. Following the 1994 floods, a cement shelter was constructed over entryway A.
Site Condition
The painted plaster relief in the upper corridors has suffered some damage, partly as a result of ancient alterations of decoration, and the action of salt efflorescence. In general, however, the rock is stable, the painted paste decoration is largely intact, and the colors are bright. Water staining is visible around cracks in the plaster of the vaulted ceilings in the two burial chambers J1 and J2.
Hieroglyphs
Setnakht
 King of Upper and Lower Egypt, Powerful are the Manifestations of Ra, Chosen of Ra, Beloved of Amen, Son of Ra, Set is Victorious, Beloved of Amen-Ra
niswt-bity wAsr-xAw-Raw stp-n-Raw mry-Imn sA-Raw stx-nxt mry-Imn-Raw
Tausert
 King of Upper and Lower Egypt, Daughter of Ra, Beloved of Amen, Daughter of Ra, The Powerful Female One, Chosen by Mut
niswt-bity sAt-Raw-mry-Imn sA<t>-Raw tA-wAsrt stp-n-Mwt

Tomb entrance at base of cliffs with modern covering for flood protection.
Book of Caverns, sixth division, final scene; Ba of Ra; Book of the Earth, part A, scenes 2 and 3: excerpts; Geb before Setnakht; Anubis and Osiris [before Setnakht, on front face of pillar 5]; Anubis [with Ra-Horakhty before Setnakht, on right and front faces of pillar 3]; Thoth; Book of Gates, eighth division (P)/ninth hour (H); funerary objects beneath all.
Horus-Iwnmutef; Horus and Anubis before Osiris.
Setnakht (as sketch) and Horus.
Book of the Dead, spell 151: Anubis attending mummy on bier with Isis and Nephthys as principal mourners at foot and head.
Book of Caverns, final scene; Ba of Ra; Book of the Earth, part A, scenes 1-2, extracts.
Book of the Earth, part A, scenes 2 and 8: extracts.
Meretseger as winged cobra on basket over djed-pillar and tyet-knots.
Sety II (replacing Siptah) offering to Isis (scene 3).
Quantapoint laser-scanning team of Eric Hoffman, Bill Irey, and Lee Greenwood setting up equipment.
Burial chamber J2.
Ramp.
Ancient plaster traces; lintel beam slot and partly cut back inner thicknesses.
Book of the Dead, spell 145.
Tausert [and Sety II (replacing Siptah)] offering ointment [to Geb] (KV 14)
Cartouches of Setnakht replacing images of Tausert; Book of the Dead, spell 145.
Horus-Iwnmutef.
Kheker frieze & Geb
Anubis and Hapy.
Book of Caverns, final scene of sixth division: variant, with ba of Ra beneath (reconstruction)
Sety II (replacing Siptah) and Tausert offering [to Geb].
Book of Gates, eighth division (P)/ninth hour (H), scene 56: souls in the Island of Flame (detail)
Book of the Earth, part A: personification of water clock (detail)

Cartouche of Setnakht inserted between figures (detail)
Double scene of Tausert (erased) led by Horus and Anubis before Osiris; image of queen replaced by cartouches of Setnakht.
Osiris seated in shrine with the four sons of Horus on Lotus.
Modern steps leading to tourist shelter and tomb entrance with modern covering.
Restored red granite sarcophagus of Setnakht.
Tomb entrance with modern covering for flood protection and old information sign.
Book of Gates, eighth division (P)/ninth hour (H), scene 60: fire-spitting serpent destroying enemies of Osiris (detail).
Book of Gates, ninth division (P)/tenth hour (H), scenes 63 and 68; tenth division (P)/eleventh hour (H), scene 77.
Book of Gates, ninth division (P)/tenth hour (H), scenes 61-62 (upper register), 68 (lower register); tenth division (P)/eleventh hour (H), scenes 72-73 (middle register).
Book of Gates, tenth division (P)/eleventh hour (H), scenes 72-73 (detail).
Book of Gates, ninth division (P)/tenth hour (H), scenes 61 (upper register), 68 (lower register); tenth division (P)/eleventh hour (H), scenes 70-72 (middle register).
Book of Gates, ninth division (P)/tenth hour (H), scenes 61 (upper register), 68 (lower register); tenth division (P)/eleventh hour (H), scene 70 (middle register).
Book of Gates, tenth division (P)/eleventh hour (H), scene 70: solar bark (detail).
Hathor, Nefertem and Thoth.
Thoth; Setnakht [before Osiris, on right face]; Osiris [before Setnakht, on front face].
Osiris [before Setnakht, on front face]; Setnakht [before Osiris, on left face]; Ra-Horakhty.
Ra-Horakhty; Mehitweret and Khnum [before Setnakht, on left face].
Book of Gates, eighth division (P)/ninth hour (H), scenes 55, 57, 59.
Book of Gates, eighth division (P)/ninth hour (H), scenes 59-60: fire-spitting serpent destroying enemies of Osiris.
Book of Gates, eighth division (P)/ninth hour (H), scenes 56, 58, 60.
Kheker frieze; Geb; Setnakht [before Mehitweret and Khnum, on front and right faces].
Kheker frieze; Anubis and Osiris [before Setnakht, on front face].
Osiris and Anubis [before Setnakht, on front face].
Kheker frieze; Setnakht before Horus.
Setnakht (replacing Tausert) offering to Anubis.
Setnakht (replacing Tausert) [before Horus].
Cartouche of Setnakht inscribed over the name of earlier owner; red granite sarcophagus.

New information sign outside tomb entrance.

Old information sign outside tomb entrance.
Tausert and Sety II (replacing Siptah) before Geb (scene 2) (reconstruction).
Book of the Dead, spell 145 (reconstruction).
Book of Gates, tenth division (P)/eleventh hour (H), scene 77: "The Callers" (reconstruction).
Book of the Dead, spell 145: guardian; cartouches of Setnakht (replacing image of Tausert).
Cartouches of Setnakht (replacing image of Tausert); Book of the Dead, spell 145.
Book of the Dead, spell 145; cartouches of Setnakht replacing image of Tausert.
Tausert [and Sety II (replacing Siptah)] offering [to Geb] (scene 2) (reconstruction).
Book of the Dead, spell 145: Sety II (replacing Siptah) (scene 2) (reconstruction).
Mehitweret as a cow-headed woman [before Setnakht, on left face] (reconstruction).
Decorative vessels (reconstruction).
Sety II (replacing Siptah) and Tausert offering to Geb (reconstruction).
Book of the Dead, spell 151: Anubis embalming mummy of deceased (reconstruction).
View from Corridor C with chamber F in the background. Courtesy of Uni Dia Verlag; Uni Dia Image Nr. 36051.
Ra-Horakhty, Ma'at, Thoth alternating with large cartouches of Setnakht replacing erased figures of queen. Ptah protected by winged Ma'at on each side of gate. Courtesy of Uni Dia Verlag; Uni Dia Image Nr. 36052.
Ptah protected by winged Ma'at on side of gate J1. Courtesy of Uni Dia Verlag; Uni Dia Image Nr. 36053.
Ra-Horakhty and Ma'at between Cartouches of Setnakht. Courtesy of Uni Dia Verlag; Uni Dia Image Nr. 36054.
Horus and Geb between alternating cartouches of Setnakht. Courtesy of Uni Dia Verlag; Uni Dia Image Nr. 36055.
Nephthys and Isis, Osiris before offering table replacing erased figure of queen. Courtesy of Uni Dia Verlag; Uni Dia Image Nr. 36056.
Nephthys and Isis. Courtesy of Uni Dia Verlag; Uni Dia Image Nr. 36057.
Nephthys and Isis. Courtesy of Uni Dia Verlag; Uni Dia Image Nr. 36058.
Horus and Anubis on pillars, incomplete images of Setnakht on right and left faces of pillars. Courtesy of Uni Dia Verlag; Uni Dia Image Nr. 36059.
View of one of the left first niche Book of Gates, ninth division (P)/tenth hour (H), scenes 63 and 68; tenth division (P)/eleventh hour (H), scene 77. Courtesy of Uni Dia Verlag; Uni Dia Image Nr. 36060.
View of niche and texts in Burial chamber J1. Courtesy of Uni Dia Verlag; Uni Dia Image Nr. 36061.
Detail from the Book of Gates eighth division (P)/ninth hour (H) (north side), ninth and tenth divisions (P)/tenth and eleventh hours (H). Courtesy of Uni Dia Verlag; Uni Dia Image Nr. 36062.
Detail from the Book of Gates eighth division (P)/ninth hour (H) (north side), ninth and tenth divisions (P)/tenth and eleventh hours (H). Courtesy of Uni Dia Verlag; Uni Dia Image Nr. 36063.
Detail from the Book of Gates eighth division (P)/ninth hour (H) (north side), ninth and tenth divisions (P)/tenth and eleventh hours (H). Courtesy of Uni Dia Verlag; Uni Dia Image Nr. 36064.
Detail from the Book of Gates eighth division (P)/ninth hour (H) (north side), ninth and tenth divisions (P)/tenth and eleventh hours (H). Courtesy of Uni Dia Verlag; Uni Dia Image Nr. 36065.
View of the northeastern corner on Burial Chamber J1. Courtesy of Uni Dia Verlag; Uni Dia Image Nr. 36066.
Book of Gates, eighth division (P)/ninth hour (H), scenes 56, 58, 60. Courtesy of Uni Dia Verlag; Uni Dia Image Nr. 36067.
Anubis and Khnum, pillar on western side of burial chamber J1. Courtesy of Uni Dia Verlag; Uni Dia Image Nr. 36068.
Setnakht (replacing original figure) before Mehitweret. Courtesy of Uni Dia Verlag; Uni Dia Image Nr. 36069.
Khnum and Mehitweret. Courtesy of Uni Dia Verlag; Uni Dia Image Nr. 36070.
Book of the Earth, part A, scenes 2 and 8: extracts. Courtesy of Uni Dia Verlag; Uni Dia Image Nr. 36071.
View of Burial Chamber J1. Courtesy of Uni Dia Verlag; Uni Dia Image Nr. 36072.
Detail of Book of Caverns, final scene; Ba of Ra; Book of the Earth, part A, scenes 1-2, extracts. Courtesy of Uni Dia Verlag; Uni Dia Image Nr. 36073.
Detail of Book of Caverns, final scene; Ba of Ra; Book of the Earth, part A, scenes 1-2, extracts. Courtesy of Uni Dia Verlag; Uni Dia Image Nr. 36074.
View of burial equipment painted on rock cut bench. Courtesy of Uni Dia Verlag; Uni Dia Image Nr. 36075.
Detail of Hathor. Courtesy of Uni Dia Verlag; Uni Dia Image Nr. 36076.
Detail of Nefertum. Courtesy of Uni Dia Verlag; Uni Dia Image Nr. 36077.
Guardian demon in Book of the Dead spell 145. Courtesy of Uni Dia Verlag; Uni Dia Image Nr. 36078.
Book of the Dead, spell 145: guardian; cartouches of Setnakht (replacing image of Tausert). Courtesy of Uni Dia Verlag; Uni Dia Image Nr. 36079.
Detail of Book of the Dead, spell 145: guardian; cartouches of Setnakht (replacing image of Tausert). Courtesy of Uni Dia Verlag; Uni Dia Image Nr. 36080.
Double scene of Tausert (erased) led by Horus and Anubis before Osiris; image of queen replaced by cartouches of Setnakht. Courtesy of Uni Dia Verlag; Uni Dia Image Nr. 36081.
Book of the Dead, spell 145. Courtesy of Uni Dia Verlag; Uni Dia Image Nr. 36082.
Detail of Book of the Dead, spell 145. Courtesy of Uni Dia Verlag; Uni Dia Image Nr. 36083.
Detail of Book of the Dead, spell 145. Courtesy of Uni Dia Verlag; Uni Dia Image Nr. 36084.
View of Northwestern corner of Chamber F - Book of the Dead, spell 145. Courtesy of Uni Dia Verlag; Uni Dia Image Nr. 36085.
Detail of Book of the Dead, spell 145. Courtesy of Uni Dia Verlag; Uni Dia Image Nr. 36086.
Detail of Book of the Dead, spell 145. Courtesy of Uni Dia Verlag; Uni Dia Image Nr. 36087.
Deceased offering to the deities Ra-Horakhty and Isis; left wall Corridor B. Courtesy of Richard Sellicks.
Corridor C looking toward Gate D and Corridor D and the rear wall of Chamber F featuring the deities Horus and Anubis before Osiris. Courtesy of Richard Sellicks.
Jambs of Gate F with reliefs of the syncretic god Horus-Iwnmutef and the rear wall of Chamber F with the deities Horus and Anubis before Osiris. Courtesy of Richard Sellicks.
Chamber E, left wall, the funerary deities Imsety, Anubis, and Duamutef, as well as the goddess Isis; Chamber E, rear wall, left side, the syncretic god Horus-Iwnmutef.
Chamber E, rear wall, right side, the syncretic god Horus-Iwnmutef; right wall, the goddess Nephthys, and the gods Qebehsenuef and Anubis. Courtesy of Richard Sellicks.
Right and rear walls of Chamber F. Book of the Dead, Spell 145; guardian deities and their gates. Courtesy of Richard Sellicks.
Left and rear walls of Chamber F. Book of the Dead, Spell 145; guardian deities and their gates. Courtesy of Richard Sellicks.
The rear wall of Chamber F. The deities Horus and Anubis before Osiris. Courtesy of Richard Sellicks.
The rear wall of Chamber F. The deities Horus and Anubis before Osiris. Courtesy of Richard Sellicks.

Corridor G. Opening of the Mouth ritual. Courtesy of Richard Sellicks
Side Chamber Ga rear wall. Book of the Dead, spell 151: the deity Anubis attends to a mummy on a bier with the goddesses Isis and Nephthys as principal mourners at the foot and head.
Side Chamber Ga, left wall. Two sons of Horus, Anubis, and two goddesses. Courtesy of Richard Sellicks.

Corridor H. Opening of the Mouth Ritual. Courtesy of Richard Sellicks.
Chamber I, left wall. The deities Ra-Horakhty and Ma'at between the cartouches of Setnakht. Courtesy of Richard Sellicks.
Chamber I, right and front wall. The deities Isis and Nephthys (right) and Osiris (front) before an offering table replacing an erased figure of the queen. Courtesy of Richard Sellicks.
Chamber I, front wall, right part. Detail of the four Sons of Horus on a lotus blossom in front of the deity Osiris enthroned. Courtesy of Richard Sellicks.
Chamber I, rear wall, left part. The deity Ptah protected by the winged deity Ma'at on each side of the gate. Courtesy of Richard Sellicks.
Burial chamber J1, front face of one of the pillars (right side in the front part of the room). Preliminary sketch of Setnakht. Courtesy of Richard Sellicks.
Burial chamber J1, front pillars, right side. The deity Osiris and Pharaoh Setnakht (left pillar); Setnakht and the goddess Mehitweret (right pillar). Courtesy of Richard Sellicks.
Burial chamber J1, left wall, center part. Book of the Earth, part A, scenes 2 and 8: extracts. Courtesy of Richard Sellicks.
Burial chamber J1. Rear left pillars. The deities Anubis, Khnum (left pillar), and Ptah (right pillar). Courtesy of Richard Sellicks.
Burial chamber J1, right wall, center part. Book of Caverns, final scene; Ba of the deity Ra; Book of the Earth, part A, scenes 1-2: extracts. Courtesy of Richard Sellicks.

Burial chamber J1, pillar. The deity Anubis. Courtesy of Richard Sellicks.
Burial chamber J1, front, left part. Pillars with the deity Osiris in a hemhem-crown beside two imiut-fetishes; the deities Anubis and Horus. Front, right part, pillar with Pharaoh Setnakht. Courtesy of Richard Sellicks.
View of Corridor L into Burial chamber J2. Courtesy of Richard Sellicks.
View from Corridor K1 into Burial chamber J1. Right and left front pillars with the deity Anubis. Courtesy of Richard Sellicks.
Imydwat, seventh hour. Corridor L, left wall. Courtesy of Richard Sellicks.
View of Burial chamber J2 and the sarcophagus. Courtesy of Richard Sellicks.
Burial chamber J2, sarcophagus, left face. Cartouches of Setnakht and the deities Isis and Nephthys in mourning. Courtesy of Richard Sellicks.
Burial chamber J2. Lid of the sarcophagus. Courtesy of Richard Sellicks.
Burial chamber J2. Lid of the sarcophagus. Courtesy of Richard Sellicks.
View of Burial chamber J2 and the sarcophagus, looking toward the entrance of the tomb. Courtesy of Richard Sellicks.
View of Burial chamber J2 and the sarcophagus; Imydwat, seventh and eighth hours, Corridor L. Courtesy of Richard Sellicks.
Burial chamber J1, rear wall, left pillar. The deity Khnum. Courtesy of Richard Sellicks.
Burial C=chamber J1, front wall, right part. Book of Gates eighth division (P)/ninth hour (H) (north side), ninth and tenth divisions (P)/tenth and eleventh hours (H). Courtesy of Richard Sellicks.
Corridor D, right wall. Book of the Dead, spells 145 and 146: guardians at their gates. Courtesy of Richard Sellicks.
Corridor B, left wall. Sethnakht, superimposed on Tausert, offering to the syncretic deity Ra-Horakhety. Courtesy of Richard Sellicks.


Articles

Historical Development of the Valley of the Kings
Anatomy of a Tomb: Ancient and Modern Designations for Chambers and Features

Funerary Compositions
Bibliography
Abitz, Friedrick. Zur Bedeutung der beiden Nebenräume hinter der Sarkophagalle der Königin Tausert. Studien zur altägyptischen Kultur 9 (1981): 1-8.
Altenmüller, Hartwig. The Tomb of Tausert and Setnakht. In: Kent R. Weeks (ed.). The Treasures of the Valley of the Kings: Tombs and Temples of the Theban West Bank in Luxor. Vercelli: WhiteStar, 2001; Cairo: American University in Cairo Press, 2001. Available in English, Italian, French, German, Spanish and Chinese. Pp. 222-231.
Altenmüller, Hartwig. Bemerkungen zu den neu gefundenen Daten im Grab der Königin Twosre (KV 14) im Tal der Könige von Theben. In: Carl Nicholas Reeves (ed.), After Tutankhamun: Research and Excavation in the Royal Necropolis at Thebes (= Studies in Egyptology). London: KPI, 1992. Pp. 141-164.
Altenmüller, Hartwig. Das Grab der Königen Tausert im Tal der Könige von Theben: Erster Vorbericht über die Arbeiten des Archäologischen Instituts der Universität Hamburg im Winter 1982/1983. Studien zur altägyptischen Kultur 10 (1983): 1-24.
Altenmüller, Hartwig. Rolle und Bedeutung des Grabes des Königin Tausret im Königsgräbertal von Theben. Bulletin de la Société d’égyptologie de Genève. Genf. 8 (1983): 3-11.
Altenmüller, Hartwig. Das Grab der Königin Tausret (KV14): Bericht uber eine archäologische Unternehmung. Göttingen Miszellen 84 (1985): 7-17.
Altenmüller, Hartwig. Tausret und Sethnacht. Journal of Egyptian Archaeology 68 (1982): 107-115.
Altenmüller, Hartwig. Der Begräbnistag Sethos II. Studien zur altägyptischen Kultur 11 (1984): 37-47.
Altenmüller, Hartwig. La tombe de la reine Taousert. Dossiers d'archéologie 149-150 (1990):64-7.
