

KV 35
Amenhetep II


Entryway A
See entire tombA staircase constitutes the entryway, which slopes down under the cliff overhang. A modern concrete shelter was built to protect the entrance from water runoff.
Gate B
See entire tombThis gate leads from entryway A to corridor B.
Porter and Moss designation:
Corridor B
See entire tombThere is a change in the slope of both floor and ceiling. There may have been an ancient stairway or ramp in the first half of this corridor but it has been heavily damaged by the installation of modern steps.
Porter and Moss designation:
Gate C
See entire tombThis gate gives access to the second staircase of the tomb.
Porter and Moss designation:
Stairwell C
See entire tombThis stairwell is flanked by wide recesses.
Porter and Moss designation:
Gate D
See entire tombThe gate leads to corridor D.
Porter and Moss designation:
Corridor D
See entire tombThis short corridor slopes down to gate E.
Porter and Moss designation:
Well chamber E
See entire tombThe walls are plastered but undecorated. A shaft is cut in the floor of this chamber, at the bottom of which lies a side chamber (Ea).
Porter and Moss designation:
Gate E
See entire tombThis gate leads into the well chamber E.
Porter and Moss designation:
Side chamber Ea
See entire tombLocated at the bottom and to the right (north) of the well shaft, the chamber is undecorated.
Porter and Moss designation:
Gate Ea
See entire tombThis gate leads from the well of chamber E to a side chamber to the right (north).
Porter and Moss designation:
Gate F
See entire tombThe gate is level and leads into pillared chamber F.
Porter and Moss designation:
Pillared chamber F
See entire tombThe axis of the tomb changes at this chamber, turning about ninety degrees to the left (south). The chamber has two pillars on a north-south axis and a stepped side descent at the southeast corner of the chamber.
Porter and Moss designation:
Descent F
See entire tombModern metal stairs cover the ancient stairway.
Porter and Moss designation:
Gate G
See entire tombThe gate leads to corridor G.
Porter and Moss designation:
Corridor G
See entire tombThere are small holes in the top of the wall at the end of the corridor, perhaps used to hold a beam, immediately before gate J. There is possibly a bolt hole. The sloping floor levels out about two-thirds of the way down the passage.
Porter and Moss designation:
Gate J
See entire tombThe gate may have been closed by a single leaf wooden door.
Porter and Moss designation:
Burial chamber J
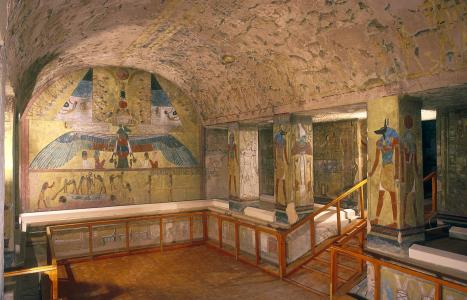
See entire tombThe burial chamber is divided into two levels: an upper section with a double row of three pillars on a north-south axis; and a lower section, covering one-third of the chamber. In the center of the lower section, sometimes called the "crypt," sits the yellow quartzite sarcophagus of Amenhetep II. There are four side chambers, two to the right (west) and two to the left (east). There are two pairs of magical brick niches on the front (north) and rear (south) walls of the crypt, and two recesses beneath those in the rear wall. The sarcophagus rests on two large calcite blocks set into a pit in the floor of the crypt.
The burial chamber is decorated with scenes of the Imydwat executed in a style similar to that in the tomb of Thutmes III (KV 34), and the pillars with representations of the king with Osiris, Hathor and Anubis.
Chamber plan:
RectangularRelationship to main tomb axis:
PerpendicularChamber layout:
Pillared front upper level, sunken rear lower levelFloor:
Two levelsCeiling:
Flat
Porter and Moss designation:

Amenhetep II receiving life from Hathor; Imydwat, first and second hours; sarcophagus.

Imsety, Anubis, Duamutef and Isis.

Osiris giving life to Amenhetep II.

Amenhetep II receiving life from Anubis and Osiris.

Amenhetep II receiving life from Anubis and Osiris.

Star pattern; kheker frieze; Imydwat, third hour.

Star pattern; kheker frieze; Imydwat, twelfth hour and abridged version.

Imydwat, abridged version: detail.

Imydwat, twelfth hour: end.

Hathor giving life to Amenhetep II.

Imydwat, seventh hour: solar bark.

Imydwat, seventh hour: detail.

Imydwat, seventh hour: subduing Apophis.

Magical brick niches.

Isis

Star pattern; kheker frieze; Imydwat, second hour.

Hathor giving life to Amenhetep II: detail.

Imydwat, fifth hour.

Imydwat, second hour.

Kheker frieze; Imydwat, second hour: detail.

Kheker frieze; Imydwat, third hour: introduction.

Imydwat, third hour.

Imydwat, third hour.

Imydwat, third hour.

Imydwat, fourth hour.

Imydwat, fourth hour.

Imydwat, fifth hour.

Imydwat, fifth hour.

Imydwat, fifth hour.

Star pattern; kheker frieze; Imydwat, sixth hour, second half.

Imydwat, sixth hour, second half, and seventh hour.

Imydwat, seventh hour.

Imydwat, seventh hour.

Imydwat, seventh and eighth hours.

Imydwat, eighth hour.

Imydwat, ninth and tenth hours.

Imydwat, tenth hour.

Star pattern; kheker frieze; Imydwat, tenth and eleventh hours.

Imydwat, eleventh hour.

Imydwat, eleventh hour.

Imydwat, eleventh and twelfth hours.

Kheker frieze; Imydwat, twelfth hour.

Imydwat, abridged version.

Anubis giving life to Amenhetep II.

Amenhetep II receiving life from Osiris.

Star pattern; kheker frieze; Imydwat, second and third hours.

Kheker frieze; Imydwat, third hour: introductory text.

Imydwat, second hour: detail.

Imydwat, first hour: detail.

Imydwat, first hour (detail).

Imydwat, third hour: detail.

Imydwat, twelfth hour (detail).

Hathor giving life to Amenhetep II (detail).

Imydwat, fourth hour.

Isis, Qebehsenuef, Anubis and Hapy.

Eye panel and Hapy (detail).

Nephthys kneeling on gold symbol (detail).

Imsety (detail).

Anubis (detail).

View of Burial Chamber J. Courtesy of Uni Dia Verlag; Uni Dia Image Nr. 35101.

From the end of the 7th hour of the Imydwat. Courtesy of Uni Dia Verlag; Uni Dia Image Nr. 35102.

Gods of the 8th hour of the Imydwat. Courtesy of Uni Dia Verlag; Uni Dia Image Nr. 35103.

Demons of the 8th hour of the Imydwat. Courtesy of Uni Dia Verlag; Uni Dia Image Nr. 35104.

Demons of the 8th hour of the Imydwat. Courtesy of Uni Dia Verlag; Uni Dia Image Nr. 35105.

Detail from the 8th Hour of the Imydwat. Courtesy of Uni Dia Verlag; Uni Dia Image Nr. 35106.

Gods of the 9th hour of the Imydwat. Courtesy of Uni Dia Verlag; Uni Dia Image Nr. 35107.

Detail of the 9th Hour of the Imydwat. Courtesy of Uni Dia Verlag; Uni Dia Image Nr. 35108.

Detail from the 10th hour of the Imydwat. Courtesy of Uni Dia Verlag; Uni Dia Image Nr. 35109.

Detail from the 10th hour of the Imydwat. Courtesy of Uni Dia Verlag; Uni Dia Image Nr. 35110.

Detail from the 11th hour of the Imydwat. Courtesy of Uni Dia Verlag; Uni Dia Image Nr. 35111.

Demons in the 11th hour of the Imydwat. Courtesy of Uni Dia Verlag; Uni Dia Image Nr. 35112.

Start of the 12th hour of the Imydwat. Courtesy of Uni Dia Verlag; Uni Dia Image Nr. 35113.

The 12th hour of the Imydwat. Courtesy of Uni Dia Verlag; Uni Dia Image Nr. 35114.

View into the Southeast corner of the Burial Chamber with stars on the ceiling. The 12th hour of the Imydwat (East, left wall), the entrance to side chamber Jb, overall title and the beginning of the 1st hour of the Imydwat (South, rear wall). Courtesy of Uni Dia Verlag; Uni Dia Image Nr. 35115.

At the end of the 12th hour and the abbreviated version of the Imydwat. Courtesy of Uni Dia Verlag; Uni Dia Image Nr. 35116.

Overall title, 1st hour, and title of the 2nd hour of the Imydwat. Courtesy of Uni Dia Verlag; Uni Dia Image Nr. 35117.

The 2nd hour of the Imydwat. Courtesy of Uni Dia Verlag; Uni Dia Image Nr. 35118.

Overview of the 3rd hour of the Imydwat and entrance to a side chamber. Courtesy of Uni Dia Verlag; Uni Dia Image Nr. 35119.

Upper register of the 4th hour of the Imydwat and Kheker Frieze. Courtesy of Uni Dia Verlag; Uni Dia Image Nr. 35120.

Detail from the 4th Hour of the Imydwat. Courtesy of Uni Dia Verlag; Uni Dia Image Nr. 35121.

Detail of the 4th Hour of the Imydwat. Courtesy of Uni Dia Verlag; Uni Dia Image Nr. 35122.

Detail of the 4th Hour of the Imydwat. Courtesy of Uni Dia Verlag; Uni Dia Image Nr 35123.

Detail of the 4th Hour of the Imydwat. Courtesy of Uni Dia Verlag; Uni Dia Image Nr. 35124.

Detail from the 4th hour of the Imydwat. Courtesy of Uni Dia Verlag; Uni Dia Image Nr. 35125.

At the beginning of the 5th hour of the Imydwat (above the door of a side chamber). Courtesy of Uni Dia Verlag; Uni Dia Image Nr. 35126.

Demons in the 5th hour of the Imydwat. Courtesy of Uni Dia Verlag; Uni Dia Image Nr. 35127.

Detail from the 5th hour of the Imydwat. Courtesy of Uni Dia Verlag; Uni Dia Image Nr. 35128.

The king between gods and demons, from the end of the 5th hour of the Imydwat. Courtesy of Uni Dia Verlag; Uni Dia Image Nr. 35129.

Detail from the 5th hour of the Imydwat. Courtesy of Uni Dia Verlag; Uni Dia Image Nr. 35130.

Gods and Demons from the 6th hour of the Imydwat. Courtesy of Uni Dia Verlag; Uni Dia Image Nr. 35131.

Crowned crooks, detail from the 6th hour of the Imydwat. Courtesy of Uni Dia Verlag; Uni Dia Image Nr. 35132.

Star ceiling, Kheker frieze, and upper part of the 6th and 7th hours of the Imydwat. Courtesy of Uni Dia Verlag; Uni Dia Image Nr. 35133.

Detail from the 6th Hour of the Imydwat. Courtesy of Uni Dia Verlag; Uni Dia Image Nr. 35134.

Detail from the 7th hour of the Imydwat. Courtesy of Uni Dia Verlag; Uni Dia Image Nr. 35135.

Upper part of the 6th hour of the Imydwat. Courtesy of Uni Dia Verlag; Uni Dia Image Nr. 35136.

Detail from the 6th hour of the Imydwat. Courtesy of Uni Dia Verlag; Uni Dia Image Nr. 35137.

Detail from the 6th hour of the Imydwat. Courtesy of Uni Dia Verlag; Uni Dia Image Nr. 35138.

Detail from the 6th Hour of the Imydwat. Courtesy of Uni Dia Verlag; Uni Dia Image Nr. 35139.

The king before Osiris. Courtesy of Uni Dia Verlag; Uni Dia Image Nr. 35140.

The king before Osiris. Courtesy of Uni Dia Verlag; Uni Dia Image Nr. 35141.

Detail from front pillar, the king before Osiris. Courtesy of Uni Dia Verlag; Uni Dia Image Nr. 35142.

The king before Osiris. Courtesy of Uni Dia Verlag; Uni Dia Image Nr. 35143.

Detail from front pillar, the king before Osiris. Courtesy of Uni Dia Verlag; Uni Dia Image Nr. 35144.

Anubis gives life to the King. Courtesy of Uni Dia Verlag; Uni Dia Image Nr. 35145.

Hathor gives life to the King. Courtesy of Uni Dia Verlag; Uni Dia Image Nr. 35146.

Anubis gives life to King. Courtesy of Uni Dia Verlag; Uni Dia Image Nr. 35147.

Hathor gives life to King. Courtesy of Uni Dia Verlag; Uni Dia Image Nr. 35148.

Hathor gives life to the King. Courtesy of Uni Dia Verlag; Uni Dia Image Nr. 35149.

Hathor gives life to the King. Courtesy of Uni Dia Verlag; Uni Dia Image Nr. 35150.

Hathor gives life to the King. Courtesy of Uni Dia Verlag; Uni Dia Image Nr. 35151.

Hathor gives life to the King. Courtesy of Uni Dia Verlag; Uni Dia Image Nr. 35152.

The sarcophagus of the King. Courtesy of Uni Dia Verlag; Uni Dia Image Nr. 35153.

The sarcophagus of the King. Courtesy of Uni Dia Verlag; Uni Dia Image Nr. 35154.

Back of the sarcophagus. Courtesy of Uni Dia Verlag; Uni Dia Image Nr. 35155.


Gate Ja
See entire tombThere is a door bolt hole in the left (north) thickness.
Side chamber Ja
See entire tombThe chamber is located to the left (east) of the burial chamber. There are door pivot holes in the floor.
Gate Jb
See entire tombThere is a door bolt hole in the left (north) thickness.
Star pattern; kheker frieze; Imydwat, twelfth hour and abridged version.
Side chamber Jb
See entire tombThe chamber lies to the left (east) of the sunken part of the burial chamber.
Star pattern; kheker frieze; Imydwat, twelfth hour and abridged version.
Gate Jc
See entire tombThere is a door bolt hole in the left (south) thickness. When found by Loret, it was partially blocked with stones.
Side chamber Jc
See entire tombThe chamber lies to the right (west) of the sunken part of the burial chamber. When found by Loret, it was partially blocked with stones. Nine royal mummies with intact wrappings lay in poorly preserved coffins, arranged in two rows.
Star pattern; kheker frieze; Imydwat, third hour.

Mummy of Amenhetep III.

Gate Jd
See entire tombThere is a door bolt hole in the left (south) thickness. The gate is now blocked with mudbricks and concrete.
Side chamber Jd
See entire tombThe side chamber is located to the right (west) of the burial chamber. In this rectangular chamber, Loret found the unwrapped mummies of two women and one young man. The chamber is now inaccessible.
About
About
The tomb, located in the west branch of the southwest Wadi, is cut into the bottom of the cliff face. The tomb's architectural design establishes the basic elements of a plan that continued into Dynasty 19. The architecture of the tomb also adds some new features to earlier tomb designs: a side chamber (Ea) was added to the base of the Well shaft; the burial chamber J was changed to a rectangular shape and divided into upper and lower pillared sections, the latter sometimes referred to as the "crypt;" a corridor (G) separating the staircase now sloped down to the burial chamber from pillared chamber F. Two stairwells (A, C) and two sloping corridors (B, D) lead down to the well chamber E with a side chamber (Ea) opening off the bottom. A rectangular pillared chamber (F) with two central pillars is located beyond the well. Its long axis is perpendicular to that of the preceding passages.
A stepped descent (F) in the floor at the southeast corner of this chamber leads to a sloping corridor (G) and the burial chamber J. This chamber has three pairs of pillars in the forepart that flank the central axis and a sunken portion beyond that is reached by a central stairs and contains the Sarcophagus. There are four side chambers (Ja-Jd) off the western and eastern sides of this chamber. Only the burial chamber of the tomb is decorated, with scenes from the Imydwat and representations of Amenhetep II with various deities. The king's mummy still lay in its sarcophagus when the tomb was discovered.
Noteworthy features:
KV 35 possesses several architectural innovations: a side chamber at the bottom of the Well shaft and a corridor (G) between descent F and the burial chamber J, which was rectangular with a floor on two levels. The form of the burial chamber established in this tomb continued in use until Dynasty 19. The tomb was also later used as a cache for royal mummies.
Site History
In Dynasty 21, KV 35 was used as a cache for the mummies of Thutmes IV, Amenhetep III, Merenptah, Sety II, Siptah, Rameses IV, Rameses V, Rameses VI, an anonymous female called the "Elder Woman" (who some think is Tiy, the wife of Amenhetep III), and a further mummy, probably of Setnakht. The mummies remained undisturbed until they were discovered by Victor Loret. The mummies of Amenhetep II, his son Websenu, and probably his mother Hatshepset Meryet-Ra were found together with the remains of the cached burials.
Dating
This site was used during the following period(s):
Exploration
Conservation
Conservation History
After the tomb was closed in 1994 because of flooding, the Supreme Council of Antiquities built a shelter to protect the burial from further flood damage and developed the lighting inside the tomb. There are glass panels around the pillars, and the floors of chamber F and burial chamber J are covered with wood.
Site Condition
The tomb is well-preserved.
Hieroglyphs
Amenhetep II
 King of Upper and Lower Egypt, Great are the Manifestations of Ra, Son of Ra, Amen is Satisfied
niswt-bity aA-xprw-Raw sA-Raw Imn-Htp

Tomb entrance at base of cliff with approach path.

Tomb entrance at base of sheer cliff with modern covering to protect it from water runoff.
Amenhetep II receiving life from Hathor; Imydwat, first and second hours; sarcophagus.
Imsety, Anubis, Duamutef and Isis.
Osiris giving life to Amenhetep II.
Amenhetep II receiving life from Anubis and Osiris.
Amenhetep II receiving life from Anubis and Osiris.

Tomb entrance with modern shelter, stairs and door.
Star pattern; kheker frieze; Imydwat, third hour.
Star pattern; kheker frieze; Imydwat, twelfth hour and abridged version.
Imydwat, abridged version: detail.
Imydwat, twelfth hour: end.
Hathor giving life to Amenhetep II.
Imydwat, seventh hour: solar bark.
Imydwat, seventh hour: detail.
Imydwat, seventh hour: subduing Apophis.

Unfinished chamber with modern flooring.

Objects from the foundation deposit discovered by Carter in 1915 at the entrance to the tomb of Amenhetep II.

Tomb entrances.
Magical brick niches.

Side chamber off of bottom of well shaft.


Star pattern; kheker frieze; Imydwat, first hour (KV 35)
Isis
Star pattern; kheker frieze; Imydwat, second hour.
Hathor giving life to Amenhetep II: detail.
Imydwat, fifth hour.

Modern staircase leading to modern door of tomb.

Engraved sign above tomb entrance to commemorate discovery of tomb in 1898.
Imydwat, second hour.
Kheker frieze; Imydwat, second hour: detail.
Kheker frieze; Imydwat, third hour: introduction.
Imydwat, third hour.
Imydwat, third hour.
Imydwat, third hour.
Imydwat, fourth hour.
Imydwat, fourth hour.
Imydwat, fifth hour.
Imydwat, fifth hour.
Imydwat, fifth hour.
Star pattern; kheker frieze; Imydwat, sixth hour, second half.
Imydwat, sixth hour, second half, and seventh hour.
Imydwat, seventh hour.
Imydwat, seventh hour.
Imydwat, seventh and eighth hours.
Imydwat, eighth hour.
Imydwat, ninth and tenth hours.
Imydwat, tenth hour.
Star pattern; kheker frieze; Imydwat, tenth and eleventh hours.
Imydwat, eleventh hour.
Imydwat, eleventh hour.
Imydwat, eleventh and twelfth hours.
Kheker frieze; Imydwat, twelfth hour.
Imydwat, abridged version.
Anubis giving life to Amenhetep II.
Amenhetep II receiving life from Osiris.

Tomb entrances.
Star pattern; kheker frieze; Imydwat, second and third hours.
Kheker frieze; Imydwat, third hour: introductory text.
Imydwat, second hour: detail.
Imydwat, first hour: detail.
Imydwat, first hour (detail).
Imydwat, third hour: detail.
Imydwat, twelfth hour (detail).
Hathor giving life to Amenhetep II (detail).
Imydwat, fourth hour.
Isis, Qebehsenuef, Anubis and Hapy.
Eye panel and Hapy (detail).
Nephthys kneeling on gold symbol (detail).
Imsety (detail).
Anubis (detail).

New information sign.
View of Burial Chamber J. Courtesy of Uni Dia Verlag; Uni Dia Image Nr. 35101.
From the end of the 7th hour of the Imydwat. Courtesy of Uni Dia Verlag; Uni Dia Image Nr. 35102.
Gods of the 8th hour of the Imydwat. Courtesy of Uni Dia Verlag; Uni Dia Image Nr. 35103.
Demons of the 8th hour of the Imydwat. Courtesy of Uni Dia Verlag; Uni Dia Image Nr. 35104.
Demons of the 8th hour of the Imydwat. Courtesy of Uni Dia Verlag; Uni Dia Image Nr. 35105.
Detail from the 8th Hour of the Imydwat. Courtesy of Uni Dia Verlag; Uni Dia Image Nr. 35106.
Gods of the 9th hour of the Imydwat. Courtesy of Uni Dia Verlag; Uni Dia Image Nr. 35107.
Detail of the 9th Hour of the Imydwat. Courtesy of Uni Dia Verlag; Uni Dia Image Nr. 35108.
Detail from the 10th hour of the Imydwat. Courtesy of Uni Dia Verlag; Uni Dia Image Nr. 35109.
Detail from the 10th hour of the Imydwat. Courtesy of Uni Dia Verlag; Uni Dia Image Nr. 35110.
Detail from the 11th hour of the Imydwat. Courtesy of Uni Dia Verlag; Uni Dia Image Nr. 35111.
Demons in the 11th hour of the Imydwat. Courtesy of Uni Dia Verlag; Uni Dia Image Nr. 35112.
Start of the 12th hour of the Imydwat. Courtesy of Uni Dia Verlag; Uni Dia Image Nr. 35113.
The 12th hour of the Imydwat. Courtesy of Uni Dia Verlag; Uni Dia Image Nr. 35114.
View into the Southeast corner of the Burial Chamber with stars on the ceiling. The 12th hour of the Imydwat (East, left wall), the entrance to side chamber Jb, overall title and the beginning of the 1st hour of the Imydwat (South, rear wall). Courtesy of Uni Dia Verlag; Uni Dia Image Nr. 35115.
At the end of the 12th hour and the abbreviated version of the Imydwat. Courtesy of Uni Dia Verlag; Uni Dia Image Nr. 35116.
Overall title, 1st hour, and title of the 2nd hour of the Imydwat. Courtesy of Uni Dia Verlag; Uni Dia Image Nr. 35117.
The 2nd hour of the Imydwat. Courtesy of Uni Dia Verlag; Uni Dia Image Nr. 35118.
Overview of the 3rd hour of the Imydwat and entrance to a side chamber. Courtesy of Uni Dia Verlag; Uni Dia Image Nr. 35119.
Upper register of the 4th hour of the Imydwat and Kheker Frieze. Courtesy of Uni Dia Verlag; Uni Dia Image Nr. 35120.
Detail from the 4th Hour of the Imydwat. Courtesy of Uni Dia Verlag; Uni Dia Image Nr. 35121.
Detail of the 4th Hour of the Imydwat. Courtesy of Uni Dia Verlag; Uni Dia Image Nr. 35122.
Detail of the 4th Hour of the Imydwat. Courtesy of Uni Dia Verlag; Uni Dia Image Nr 35123.
Detail of the 4th Hour of the Imydwat. Courtesy of Uni Dia Verlag; Uni Dia Image Nr. 35124.
Detail from the 4th hour of the Imydwat. Courtesy of Uni Dia Verlag; Uni Dia Image Nr. 35125.
At the beginning of the 5th hour of the Imydwat (above the door of a side chamber). Courtesy of Uni Dia Verlag; Uni Dia Image Nr. 35126.
Demons in the 5th hour of the Imydwat. Courtesy of Uni Dia Verlag; Uni Dia Image Nr. 35127.
Detail from the 5th hour of the Imydwat. Courtesy of Uni Dia Verlag; Uni Dia Image Nr. 35128.
The king between gods and demons, from the end of the 5th hour of the Imydwat. Courtesy of Uni Dia Verlag; Uni Dia Image Nr. 35129.
Detail from the 5th hour of the Imydwat. Courtesy of Uni Dia Verlag; Uni Dia Image Nr. 35130.
Gods and Demons from the 6th hour of the Imydwat. Courtesy of Uni Dia Verlag; Uni Dia Image Nr. 35131.
Crowned crooks, detail from the 6th hour of the Imydwat. Courtesy of Uni Dia Verlag; Uni Dia Image Nr. 35132.
Star ceiling, Kheker frieze, and upper part of the 6th and 7th hours of the Imydwat. Courtesy of Uni Dia Verlag; Uni Dia Image Nr. 35133.
Detail from the 6th Hour of the Imydwat. Courtesy of Uni Dia Verlag; Uni Dia Image Nr. 35134.
Detail from the 7th hour of the Imydwat. Courtesy of Uni Dia Verlag; Uni Dia Image Nr. 35135.
Upper part of the 6th hour of the Imydwat. Courtesy of Uni Dia Verlag; Uni Dia Image Nr. 35136.
Detail from the 6th hour of the Imydwat. Courtesy of Uni Dia Verlag; Uni Dia Image Nr. 35137.
Detail from the 6th hour of the Imydwat. Courtesy of Uni Dia Verlag; Uni Dia Image Nr. 35138.
Detail from the 6th Hour of the Imydwat. Courtesy of Uni Dia Verlag; Uni Dia Image Nr. 35139.
The king before Osiris. Courtesy of Uni Dia Verlag; Uni Dia Image Nr. 35140.
The king before Osiris. Courtesy of Uni Dia Verlag; Uni Dia Image Nr. 35141.
Detail from front pillar, the king before Osiris. Courtesy of Uni Dia Verlag; Uni Dia Image Nr. 35142.
The king before Osiris. Courtesy of Uni Dia Verlag; Uni Dia Image Nr. 35143.
Detail from front pillar, the king before Osiris. Courtesy of Uni Dia Verlag; Uni Dia Image Nr. 35144.
Anubis gives life to the King. Courtesy of Uni Dia Verlag; Uni Dia Image Nr. 35145.
Hathor gives life to the King. Courtesy of Uni Dia Verlag; Uni Dia Image Nr. 35146.
Anubis gives life to King. Courtesy of Uni Dia Verlag; Uni Dia Image Nr. 35147.
Hathor gives life to King. Courtesy of Uni Dia Verlag; Uni Dia Image Nr. 35148.
Hathor gives life to the King. Courtesy of Uni Dia Verlag; Uni Dia Image Nr. 35149.
Hathor gives life to the King. Courtesy of Uni Dia Verlag; Uni Dia Image Nr. 35150.
Hathor gives life to the King. Courtesy of Uni Dia Verlag; Uni Dia Image Nr. 35151.
Hathor gives life to the King. Courtesy of Uni Dia Verlag; Uni Dia Image Nr. 35152.
The sarcophagus of the King. Courtesy of Uni Dia Verlag; Uni Dia Image Nr. 35153.
The sarcophagus of the King. Courtesy of Uni Dia Verlag; Uni Dia Image Nr. 35154.
Back of the sarcophagus. Courtesy of Uni Dia Verlag; Uni Dia Image Nr. 35155.


Articles

Development of Tombs in the Valley of the Kings
Anatomy of a Tomb: Ancient and Modern Designations for Chambers and Features

Funerary Compositions
Bibliography
Loret, Victor. Le tombeau d'Aménophis II et la cachette royale de Biban el-Molouk. Bulletin de l’Institut d’Égypte (3 sér.) 9 (1899): 98-112.
Loret, Victor. Le tombeau de Thoutmes III à Biban el-Molouk. Bulletin de l’Institut d’Égypte. Cairo. (3 ser.) 9 (1899): 91-97.
Müller, Maya. Zum Werkverfahren an thebanischen Grabwänden des Neuen Reiches. Studien zur altägyptischen Kultur (Hambourg) 13 (1986): 149-164.
Porter, Bertha and Rosalind Moss. Topographical Bibliography of Ancient Egyptian Hieroglyphic Text, Reliefs, and Paintings. I, 2. The Theban Necropolis: Royal Tombs and Smaller Cemeteries. Oxford: Clarendon Press, 1964. Pp. 554-556.
Reeves, Carl Nicholas. Valley of the Kings: The Decline of a Royal Necropolis (= Studies in Egyptology). London: KPI, 1990. Pp. 192-199.
Romer, John. Thutmosis I and the Biban el-Molouk: Some Problems of Attribution. Journal of Egyptian Archaeology 60 (1974): 129-133.
Thomas, Elizabeth. The Royal Necropoleis of Thebes. Princeton: privately printed, 1966. Pp. 77-78.
Van Siclen, Charles C. Appendix II. In: John Romer: Thutmosis I and the Biban el-Molouk: Some Problems of Attribution. Journal of Egyptian Archaeology 60 (1974): 129-133.
Weeks, Kent R. Measurements of KV Royal Tomb Components. In: Richard H. Wilkinson and Kent R. Weeks (eds.). The Oxford Handbook of the Valley of the Kings. Oxford: Oxford University Press, 2016. Pp. 583-599.